
No one wants to be linked to an ugly looking spreadsheet with a URL that’s 256 characters long, just to have read-only access to the document. Luckily, thanks to JavaScript, we can beautify that raw looking Google Sheet you created in your Drive so it’s easier on the eyes and so you can host it on your own site. Better yet, it will automatically update if you’re working with dynamic content within the spreadsheet. And before anyone else beats me to it, I will admit that this is a very “dirty” way of accomplishing this, but please feel free to see the very bottom of this post for feedback inquiries.
For starters, I have created a GitHub repository complete with a pre-built index page, CSS stylesheet, and the JavaScript file that draws the table for you. You can download the files from there.
See a live demo here: https://dev.crunchprank.net/google-sheets-to-html/
Setting Your Google Sheet To Public
I’m starting this guide on the assumption you’ve already downloaded the necessary files from the GitHub repository, and have created a Google Sheets document in your Google Drive.
The next step in the process is assuring that your Google Sheet’s sharing is set to “Public”, specifically with the option “Anyone on the internet can find and view”. However editing capabilities are completely restricted and the user can only read the data. Follow the steps below to accomplish this.
Step 1
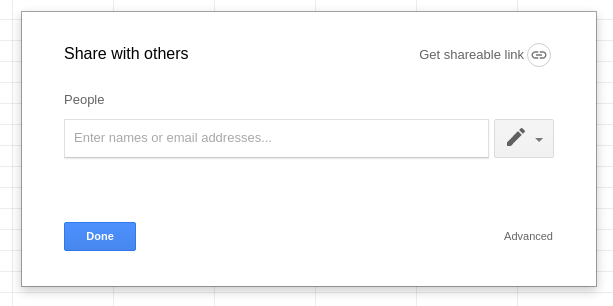
Open up your Google Sheet in your Google Drive and click the blue “Share” button at the top right of your browser:
Step 2
You should now be looking at a dialog box with sharing properties. In the bottom right of that box is a small “Advanced” link. Click that.
Step 3
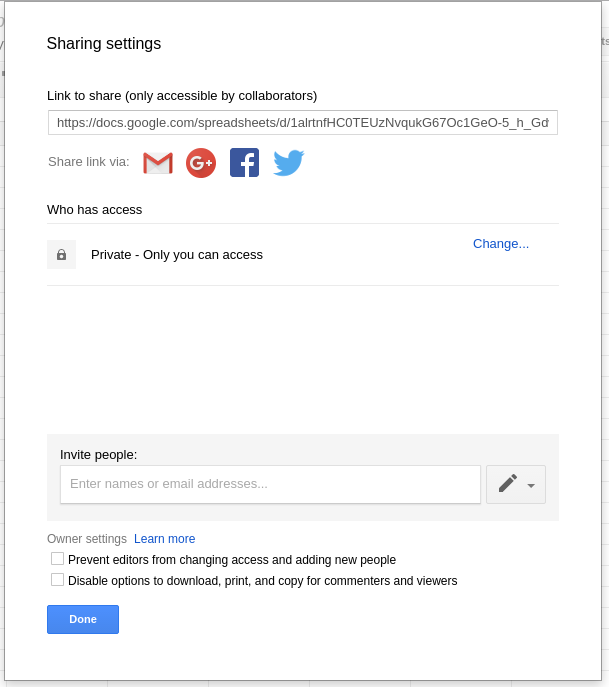
The basic sharing settings have now been converted to the Advanced sharing settings. Where you need to make your adjustment is under the “Who can access” portion of this dialog box. Click on the “Change…” link off to the right.
Step 4
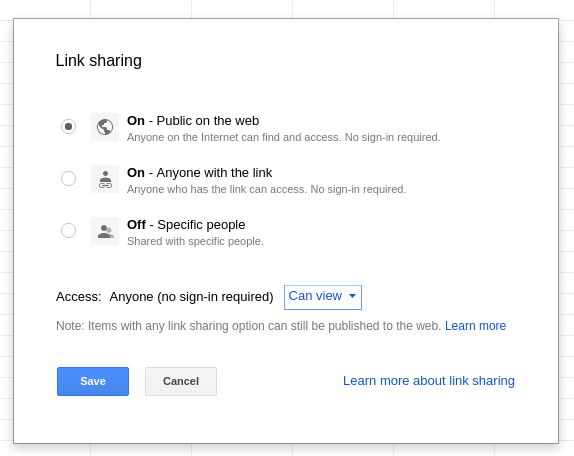
Here is where you define two very important properties. First off, change the “Link Sharing” to “On – Public on the web”. Second, the “Access: Anyone (no sign-in required)” option needs to be set to “Can view” – this is very, very important so your document is only viewable and not able to be edited by anonymous users. Once you’re sure you’ve set the two properties to what the need to be, hit Save.
Step 5
After hitting save on the previous box, you will be taken to another window that looks like the below. The information you need from here is under the “Link to share”.
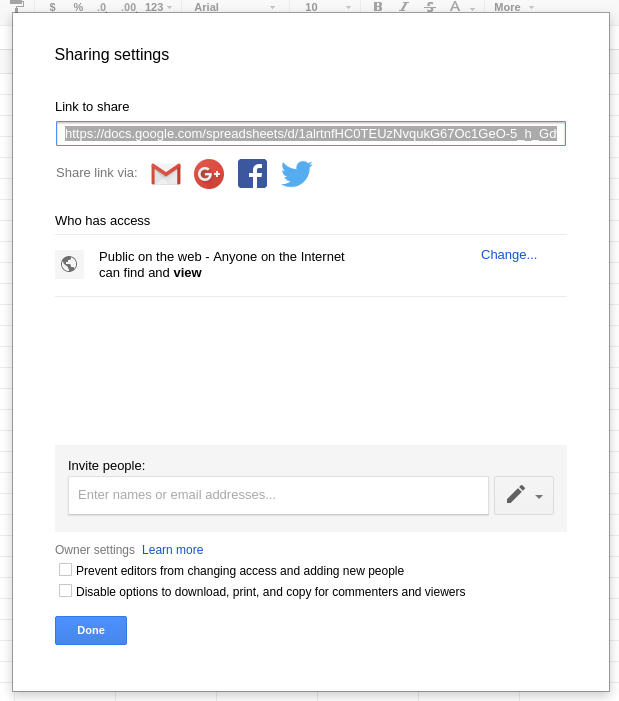
This will give you a link that looks similar to:
https://docs.google.com/spreadsheets/d/1Pm0y3vbhD-kDMKP7gJIZU-RaDD9P2zpz-O-82OZNSrE/edit?usp=sharingThis means that your unique Google Sheet ID is:
1Pm0y3vbhD-kDMKP7gJIZU-RaDD9P2zpz-O-82OZNSrEStep 6
The final step is super simple, and where the magic happens. Referring back to the files hosted in the GitHub repository, the js/google-sheets-html.js
is where you will need to place this unique identifier which will
automatically populate your webpage with whatever Spreadsheet you’re
referencing to.
On Line 18 of js/google-sheets-html.js, there is a snippet that looks like this:
var query = new google.visualization.Query('https://spreadsheets.google.com/tq?key=XXXXX-XXXXX-XXXXX-X-XXXXX&output=html&usp=sharing');All you need to do is replace the XXXXX strings with your unique Google Sheets ID so that it looks, given the example link above, like this:
var query = new google.visualization.Query('https://spreadsheets.google.com/tq?key=1Pm0y3vbhD-kDMKP7gJIZU-RaDD9P2zpz-O-82OZNSrE&output=html&usp=sharing');Recap
Clone / download the files from the GitHub repository and upload them to your website, create a Google Sheets document and set it to be publicly viewed (but not publicly edited), get the share link provided by Google, and replace the placeholder ID in js/google-sheets-html.js with your Sheet’s ID – that’s it.
google-sheets-html.js
There’s some cool things you can do with this that aren’t in the example JavaScript file, but I wanted to cover just a few very simple ones.
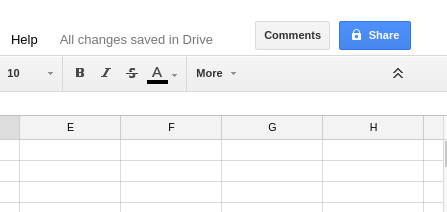
Adding Columns
I think the included example is self-explanatory – it’s a spreadsheet that only has 4 columns that you’ve designated header titles for. However if your Google Sheet has more than just the A, B, C, and D columns, then you will need to add those here or the script will generate an error. Say if you had 10 columns, you would need to add A, B, C, D, E, F, G, H, I, J as well as give each of them a header title.
Sorting
You can also specify column sorting and direction (e.g. asc or desc). For example, if I wanted the Sheet to load by default with column B sorted ascending, I would make this adjustment:
query.setQuery('SELECT A, B, C, D order by B asc label A "Duration", B "Song", C "Requested By", D "URL"');Specifying Tabs
One last
neat little trick is the ability to choose a certain tab of a Google
Sheet in case you have a spreadsheet that has multiple tabs but you only
want to show one. In this case, you will need to open up the
spreadsheet, click on the tab in the spreadsheet you want to use, and
look at the URL in your browser. You should see a gid identifier that looks similar to this:
gid=2134969781If you want to display just that one tab, all you need to do is insert that gid
value in the JavaScript URL where you put your Google Sheets ID at
earlier. So a complete URL should look like the following, replacing the
X’s with your information:
var query = new google.visualization.Query('https://spreadsheets.google.com/tq?key=XXXXXXXXXXXXXXXXXXXXX&output=html&gid=XXXXX&usp=sharing');CSS Styling
CSS is obviously not necessary
for this to function – but it is a necessary tool in making it look
better than Google’s default CSS styling. You are free to customize the
included CSS stylesheet (css/main.css) however you see fit. I just decided to style it similar to my own site/blog.
In the CSS file, I have commented around the section that relates to Google’s CSS. You may also notice all the !important
declarations – this is because I had a difficult time trying to
overwrite the CSS that Google was forcing. Essentially Google was
calling a CSS file from a JavaScript file which was causing hierarchy
problems. I know using !important isn’t the most elegant
solution, but it gets the job done! Google’s class names are also
well-named so that you know which is which: there are properties you can
adjust for “even” and “odd” rows, “hovering” over the rows, “selecting”
a row, and the table header styling.
Feedback
There are many opportunities you could utilize this very simple script for. However I would highly, highly recommend you to not use this solution for large spreadsheets. I have done some stress-testing and while it can handle quite a bit, after a while it starts to slow down to a crawl, generate errors, etc.If you have any questions or suggestions on improvements then please reach out to me. HTML/CSS/JS is not my profession so there are bound to be some ways to better the script and I would love the feedback. You can reach me via these contact methods, the comment section below, or forks/requests via the GitHub repository.